Search
Close this search box.

From Zero to Hero: A Comprehensive How-To Guide for Wing Foiling

This guide offers everything you need to know about wing foiling, from basics for beginners to advanced techniques and gear recommendations. It’s your one-stop resource for embracing this exhilarating water sport.
Table des matières

Introduction to Wing Foiling

Wing Foiling is not here to replace windsurfing, kitesurfing, and surfing. It’s a complement, an addition, an alternative, and a “sub-genre” of wave riding and sailing.

This new discipline primarily offers a sensation of freedom. The operating principle is to play with the wind by holding a wing foil in one’s hands while having a Foil under a board.

What is wing foiling ?

Wingfoiling is an entirely new board sport that was introduced to the general public in early summer 2019. This sport is very simple and very accessible since it involves standing on a stand-up paddleboard or on a board equipped with a foil to be towed on the water while holding in hands an inflatable, compact, very light, and maneuverable wing: the “wing”.
Swan-2022-Moorea

While the principle of holding a wing in hand already existed in the 1980s, the bulkiness and weight of the old rigid structures, combined with the friction generated by the board, provided sensations quite different from those offered by today’s new wings. It’s thanks to the inflatable technology used for kitesurfing wings and following the surge of wingfoiling that this sport truly took off. This discipline is neither windsurfing, kitesurfing, nor surfing, but a real mix of all three.

The sport thus presents itself as a complement and a real alternative to these disciplines, without necessarily seeking to jump higher, surf bigger waves, or display real speed performance. No, the initial interest of wingfoiling is to be able to move easily and freely on a body of water with just a breeze.

History of wing foiling : from a chaotic start to a meteoric trend

It was in the 1980s, inspired by seagulls, that Tom Magruder developed the Wind Weapon: a rigid sail that freely rotates on a windsurf board. This passionate hang glider enthusiast and windsurfer based his design on his past experience to develop a pivoting wing. A wing that at the time did not find success among riders.

1982

Another concept, closer to today’s sails, was born. These sails, then called “Bird Sail” or “Aile d’Oiseau,” were patented in 1982 by a Frenchman named Roland Le Bail.

A computer scientist in civilian life and originally from Carnac in Brittany, Roland Le Bail got the idea to develop this wing by observing seagulls on windy days. Thus, the Birdsail was born.

The concept met with relative success (too competitive at the time with the rising popularity of windsurfing).

It was almost 40 years later that the Birdsail, having become wingfoil, became democratized, thanks in particular to the advent of the foil.

2011

In 2011, Tony Logosz developed an inflatable wing named “Slingwing.”
He was inspired by Magruder’s work and another rigid frame device called “Kitewing” (itself inspired by hang gliders).

By pairing a paddle and a stand-up paddleboard, the rider could then progress with the wind’s traction.

At this time, a few brands developed prototypes of inflatable wing sails. They were very similar to the wings we use today for WingFoil practice.

However, the market in 2011 was not ready, and the concept fell by the wayside.

2019

In March 2019, the brand Duotone launched the international production of its first WingFoil sail (it was equipped with a wishbone to improve handling of the wing).

Other brands, Slingshot, Naish, F-One, Takuma, also released at least one model of wing that same year.

Often mocked at the beginning, this discipline is now one of the most sought after by riders. Many of them now practice only that!

Having become a discipline in its own right, wingfoil continues to increase its number of enthusiasts.

With compact equipment and easy learning, WingFoiling is the trendiest sport.

Getting Started with Wing Foiling

If the first steps are ideally taken on a voluminous board like a stand-up paddleboard, one quickly acquires a sensation of gliding without having to exert much physical effort, thanks to holding this very light inflatable wing.

Also, the desire to test the “wing” with a foil board under one’s feet is quickly felt. One will then move towards a much more compact float equipped with a foil to fly above the surface of the water, towed by the wing.

Offering no friction, the foil allows for quickly getting up to speed in very light wind and then speeding up to take long tacks, easily going upwind, gliding down offshore swell, or catching a series of waves to surf. The sensations are immediate, and wingfoiling quickly becomes very addictive!

Choose your foil full set

A foil consists of four parts: a mast, a front wing, a stabilizer, and a fuselage.

Material

There are two types of construction: aluminum or carbon. The advantage of aluminum is the price. However, over time it tends to deform more and be less efficient. It is also heavier. We recommend a carbon foil regardless of your level. Find in this article all the advantages of riding with a carbon foil.

Front wing

Aspect Ratio. There are 2 types of wings, “high aspect” and “low aspect,” these terms refer to the “aspect ratio” or the “wing elongation.”

To determine the aspect ratio, you need to base it on the following calculation: divide the square of the wingspan by the lifting surface area. In other words, for the same surface area, a high aspect wing is characterized by a large wingspan and narrow chord. A “low aspect” wing is characterized by a shorter wingspan and thicker chord (the wing is thicker).

The best one to begin. For someone who has never practiced foiling, a large “low aspect” front foil wing, around 1800cm² preferably, is the best choice to facilitate takeoff and support progression. However, if you have already practiced and flown in wind or kitefoil, you can directly opt for a “medium or high aspect” wing.

AFS Front wing

Rear wing also called stabilizer

To choose a wingfoil stabilizer, you need to consider 2 elements: The surface area: The surface area of the stabilizer is not necessarily proportional to the surface area of the front wing. A larger stabilizer offers more tolerance in foot placement. With a small wing stab, the support must be precise and refined. Beginners should favor large front wings with large stabilizers. Level of practice: As for progression, riders will tend to decrease the size of the stab to have a more lively foil. A small stabilizer allows for increasing the high range of the foil. In the low range, a small stab gives the impression of less lift, and this is related to the need for more refined support.
AFS Front wing

The smaller a stabilizer is, the more necessary it is to recenter one’s center of gravity over the front wing. By decreasing the size of the stab, it may be necessary to move the foot position back or advance the position of the plate.

Normally, when purchasing a complete beginner foil, you won’t have to choose (the stabilizer is often recommended with the front wing), but it is good for your knowledge to understand how the stab works.

Mast

Alu or carbon? Two choices are available to you for the construction material of your mast: carbon or aluminum.

Aluminum is ideal for beginners, as it is more economical. However, it requires more maintenance, is heavier, and can get damaged more easily than carbon foils. It is widely used in wing foil schools.

Progression in wingfoiling is relatively fast, and an aluminum mast for personal use can quickly become obsolete. Aluminum oxidizes more quickly than carbon. If you plan to ride in saltwater, it is preferable to opt for carbon.

Carbon masts offer better performance, giving riders unmatched responsiveness and precision. This directly translates into faster and more efficient progression.

Find the 5 advantages to ride with a carbon foil.

AFS Mast

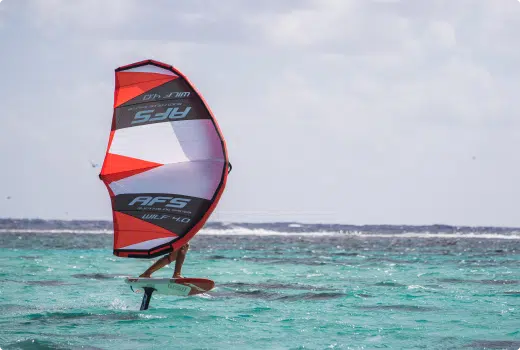
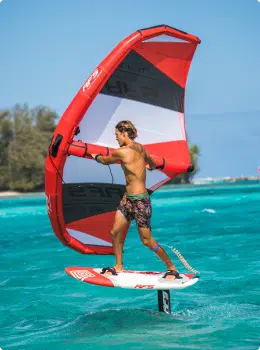
Which size? For beginners in foiling, masts between 65 cm and 75 cm are recommended for use on flat bodies of water. These masts can also be suitable for experienced riders in shallow spots. Once the stages of flight are mastered, it is possible to move on to longer masts.

Masts of 80/85 cm offer more comfort and maneuverability in flight, making maneuvers easier.

Masts of 90 cm and 100 cm increase the angle of attack. They are recommended for experienced wingfoilers, as they offer an increase in speed, precision, and control of the wing.

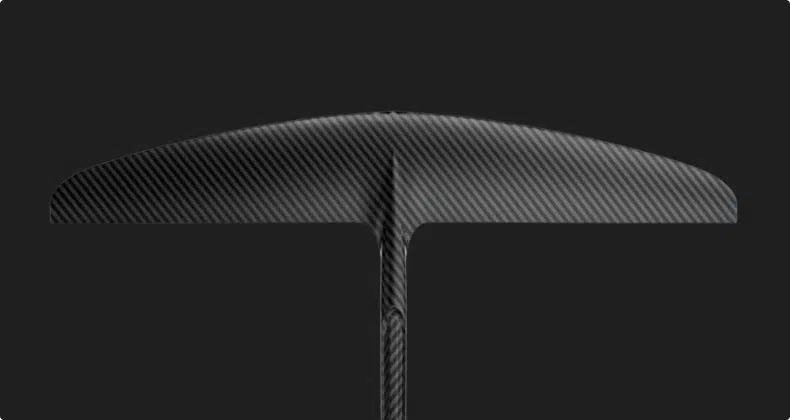
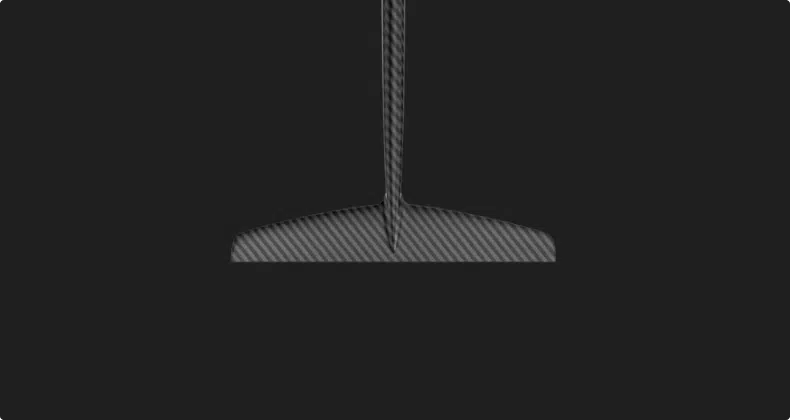
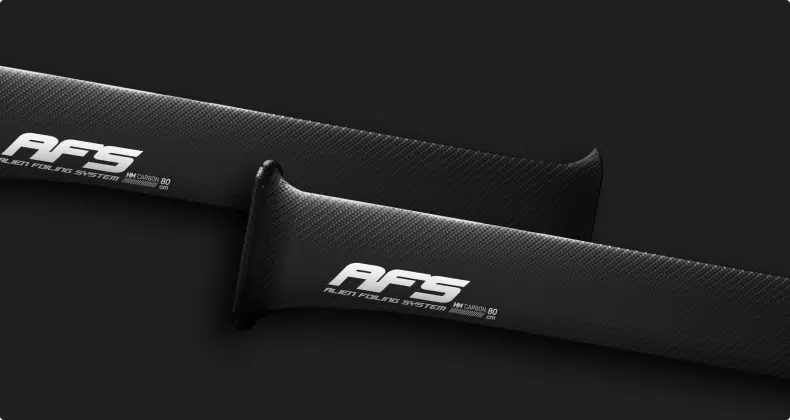
HR, HM, and UHM, what is that?  A carbon fiber is characterized by its Young’s modulus, which, to simplify, corresponds to resistance to deformation (stiffness). The higher the Young’s modulus, the stiffer the fiber will be but also the more expensive. Today, we can classify carbon fibers in terms of stiffness in this order:

  1. Normal Carbon (often when not specified, it refers to this type of carbon)
  2. HR Carbon (High Resilient)
  3. HM Carbon (High Modulus)
  4. UHM Carbon (Ultra High Modulus)

Moreover, a mast is also characterized by its thickness and width (which is called chord). Thus, for equal thickness, height, and width, an HR carbon mast will be less stiff than a UHM carbon mast.
In parallel, reducing the thickness and chord of a mast will provide more glide. A high-performance mast will seek these extremes. If the fibers are not modified, then stiffness is lost. That is why to compensate for this, work is done with HM and UHM carbon fibers.
Today, for example, in our AFS range, an HR Carbon, HM Carbon, or UHM Carbon mast have roughly the same stiffness. However, they have different chords and thicknesses.

Fuselage

On the same model of foil, a long fuselage will allow for more comfortable navigation but will provide less responsiveness to the foil. For long freeride tacks, prefer a long fuselage. If you want to surf waves or carve, a short fuselage will be your best ally.

A short/reduced fuselage requires you to be more precise with your supports and foot placement. When starting, it’s better to choose a long fuselage… Fuselage lengths vary from 65 to 90 centimeters. For a beginner, we would recommend 65-70cm, between 60-65 cm for an experienced rider, and less than 60cm for a wingfoiler looking for an ultra-responsive foil.

Normally, when purchasing a complete beginner foil, you won’t have to choose, but it can always be interesting to know how a fuselage works.

AFS Fuselage

Board

Length

The longer a board is, the more it will glide on the water. For beginners, we recommend a rather long board to enjoy flight as quickly as possible. Conversely, a shorter board allows for more radical turns, a more technical and physical ride, and an instant response.

Very small boards have a very low glide speed but are ultra-responsive, offer high performance, and are easily transportable if they have a reasonable volume and width. They are suited for more experienced riders

AFS Pro

Outline

This refers to the outer curve of the wing board. Boards with a rectangular outline and wide ends are easier to balance, take off early, and are more compact, which requires less technique – in our range, these are the Fly Rouge and Fire models.

Boards with an ovoid outline, featuring thinner ends, require an advanced level for balance and takeoff, but offer optimal responsiveness and control.

Width

The width of the wing board affects balance, lift, and maneuverability. The wider a board is, the more stable it will be. In our range, this particularly includes the Fly boards.

Volume

For beginners in winging, it’s important to favor a positive volume relative to one’s weight. Ideally, we recommend choosing a volume that is +10 liters compared to your weight.

An intermediate level practitioner could opt for a volume roughly equivalent to their weight. Finally, an experienced rider could go for volumes below their weight. These boards will require more physical effort to get started.

Construction

Today, there are two main types of construction: inflatable (air) and rigid.
Rigid boards often use a sandwich construction. Similar to a sandwich, there’s a core, often a foam block, with outer skins that can be PVC, fiberglass, or carbon.
Although more cumbersome, we tend to recommend rigid boards for all levels as they directly provide more sensation, have better glide, and thus allow for faster progression (compared to an inflatable board).

Don’t hesitate to also ask for the thickness of the pad if it’s not indicated, because when you’re starting out, for example, you spend some time on your knees. A thicker pad provides more comfort in this position.

You can find all our foil boards.

Wing

It allows riders to catch the wind and thus move forward, on the same principle as kitesurfing or windsurfing.

The wing is held via a wishbone or handles (depending on the models and brands) and is paired with a board and a foil or a stand-up paddleboard for learning. It is secured by a leash.

The sizes can vary from 2m² up to 8m². The choice of size is made according to your build and your range of use. Here is a table that should help you in making your choice.

Wind range <70kg Date 70–90 kg >90 kg
10–20 knots 4 m2 5 m2 6 m2
>20 knots 2–3 m2 3 m2 4 m2
AFS Diamond wing

You can also find also our wing foil packages ready to ride and all our wingfoiling products.

Techniques and Tips for Wing Foiling

Description: Practical advice on mastering wing foiling, covering basic maneuvers to advanced techniques.

Fundamental Techniques

How to adjust your foil in a double US rail?

The further forward the mount is, the more power you will have. A larger build will compensate by moving forward in the box.

In low winds, underpowered, soft waves, light wind, you can also move the mount forward to gain more lift.

If you tend to get ejected or if you have to press very hard on the front leg (lighter build, high speed…) you should move the foil back in the boxes.

Preparing your wing: unrolling, securing, and inflating

    1. Take the wing out of the bag. Ensure you open the wing bag properly to avoid pulling on the wing and risking it getting caught in the zipper.


    1. Unroll the wing. Lay your wing on the ground and unroll it: first the central bladder, then one tip after the other. Place each part flat on the ground.


    1. Secure the wing’s leash under the pump. Once the wing is unrolled, a gust of wind could make it fly away and risk damaging it. To avoid this, take the wing’s leash and secure it under the pump before inflating.


    1. Connect the pump to the wing. Take the nozzle of your pump and insert it into the valve on the leading edge bladder designed for this purpose. For added security, if your pump has a leash, you can attach it to the wing’s handle.


    1. Inflate the wing. To efficiently inflate the wing, give a few pump strokes to shape the wing (do not fully inflate immediately). To properly position the sleeves, you can lightly tap the bladders, allowing them to inflate correctly. Then, finish inflating to 6-7 PSI.


  1. Disconnect the pump from the wing. After fully inflating the wing, you can disconnect the pump and close the valve.

What weather conditions are best for wing foiling?

A beginner will prefer conditions with sea wind. Drifting, the practitioner will naturally return to the beach. We recommend – if possible, a protected bay. There are many in Corsica, and we cover them here if you want to start in warm conditions during your vacations!

Prefer short tacks for starting. This allows you to adjust your equipment and anticipate your drift. If you manage to stay on a short tack, you go further and should be able to head upwind.

The strength of the wind can be observed with the formation of whitecaps. When you start to see these whitecaps, it means there is about 10 knots (18 km/h). Ideally, you should start with a minimum of 12 – 14 knots, which allows for easier balancing.

Starting and First Tacks in Wing

Moving Away from the Shore. To move away from the shore, we recommend attaching your board and wing leashes before leaving. Then, flip the board over so the foil faces the sky. Use it to move away from the shore while keeping your wing out of the way to prevent it from getting caught in the front wing or stabilizer.

Once the sea reaches your waist, you can flip the board back over and get on it on your knees. The ease with which you can stand up will depend on your board.

The more voluminous it is, the more stable it is. On a board larger than 100 liters, you can stand up directly and then move forward calmly, like on a stand-up paddleboard.

Once you’re standing, you need to master the wing. To keep the wing elevated, remember to keep your front hand above the rear. The wing is curved and just wants to pivot on its axis; if you lower your arm, it will turn downwards and throw you off balance.

If you feel that you are gaining too much speed and/or are unbalanced, release the rear while keeping the front hand high.

Learning Wing Surfing Without a Foil?

Moving Away from the Shore. To familiarize yourself with this new discipline, it is entirely possible to use your board, but a different support such as a windsurfing float or an inflatable stand-up paddleboard allows you to grasp the handling of the sail without worrying about the hydrofoil. The advantage of the inflatable paddle is that it is not afraid of shocks, even if it drifts a bit more. The ideal is a rigid SUP, which provides both glide and ease. Don’t hesitate to watch all our tutorial videos at the end of this post; mimicry is an excellent way to progress!

For those living in the mountains, your sail can also be taken skiing or snowboarding to find sensations in the snow, or to prepare well for the summer season!

If you practice other board sports (wing foil or kitesurf), progression should also be faster.

How to Find the Right Position on Your Wing Foil Board to Take Off?

To initiate takeoff, foot placement is important. If you place your feet at the front of your board, you will not glide because the weight is poorly distributed. However, this technique can be interesting when you want to return to shore or when you are overpowered in strong wind

To take off, you will need to move your back foot back and look for the feeling of arching. At this point, you should shift your weight forward so that the board positions horizontally. If you are starting out, try to do “touch and goes”: take off and land the board multiple times over a few meters. This technique helps to learn how to regulate flight.

AFS Fly

Advanced Maneuvers

How to Switch Your Feet in Wing Foiling?

During your rides, you can perform your foot switch before or after the maneuver. Everyone has their preference, and it can depend on how comfortable you are riding goofy or regular. To switch your feet before or after the maneuver, you first need to lift the wing to get a good view and check that no one is behind you. Safety first!

Next, you need to anticipate that when you change feet, the board will tend to land back on the water. So, you’ll try to give a little pump just before switching to relaunch the board and be higher on the water. The switch is done either one foot after the other, or if you’re comfortable, by making a jump. At that moment, the back foot will come to take the place of the front foot. In terms of flight trajectory, the board will want to land at the end of the foot change.

So, you’ll need to quickly relaunch to resume a more stable flight to close your maneuver. Use your gaze to try to lock in your position. Aim at something in the distance and avoid looking at your feet

How to Pump in Wing Foil?

The technique will differ depending on the equipment used. Indeed, if you use a large foil with a long fuselage, the pumping will be more focused on inertia with a lower frequency. However, if you use small wings and a short fuselage or a surf-type board, you will need to bring a certain rhythm, frequency.

Once you’ve grasped the sensation, you can perform “touch and goes” to practice. That means you will take off, land the board, and take off again, etc.

With pumping, you need to ensure that the flows, that the glide is optimized. Therefore, it’s important to perform the movement correctly, even if it means going slower, rather than seeking speed by doing poor pumping.

Try to be light, let the foil rise and then descend, it will accelerate on its own. You need to lighten up and let it accelerate. You must give an impulse on the back leg to make the board rear up and put weight on the front leg to bring lift to the foil and to take off or stay in flight.

As you can see, the technique depends on the equipment and your cardio. Practice is key to success, but to stay in shape and perform in wing foil, do sports!

AFS Fly

How to Perform a Jibe in Wing Foil?

  1. Secure the maneuver by lifting your wing or looking through the window to see if there’s space to jibe.
  2. Reduce speed so as not to enter the jibe too quickly.
  3. Initiate a turn inward, with the wing high
  4. At the moment you head downwind, release the wing.
  5. As you come into the wind, you need to grab the wing from the other side. Switch hands on the handle while continuing your turn, to edge again and set off. What’s important is to always lean into your turn so that you maintain constant edging.
 

How to Perform a Tack in Wing Surfing?

To execute a tack, the key will be to maintain good lift at the foil level by aiming to head upwind.
Therefore, position your wing high and initiate a turn with your back to the wind.

To maintain lift, it may be useful to add a bit of pumping by pressing on the back foot as you start the tack.

The movement of the wing is crucial. You need to send your wing over your head at the right moment, completely to the other side. Once facing the wind, you need to maintain the curve.

Of course, don’t forget to focus on your stance so as to continue to close your turn, to go retrieve your wing from the other side and relaunch. It’s important to maintain your edging (curve) to avoid risking going back the other way. To prevent this, you need to lean slightly into your turn.

Maintenance and Care for Your Equipment

Advanced Maneuvers

At AFS, we use full carbon. This means a total absence of corrosion or oxidation, as can be found on hybrid carbon/aluminum products. There’s really no need to rinse your equipment or use Tef-Gel.

Should you disassemble your foil?

You can very well leave your equipment fully assembled. The only thing to check is the tightening of the screws, especially for new parts.
info After 2-3 hours of navigation, the parts adjust to each other, and some play may appear. Always check during your first few sails!

If you are interested in, we also have some used wing foil gear.

Cart
Close
  • No products in the cart.
Click outside to hide the comparison bar
Compare

NEWSLETTER

Your subscription to the mailing list has been registered

Caractéristiques techniques